If you’ve ever spent hours troubleshooting a connector installation that keeps slipping, shorting out, or failing quality testing, you know that even the smallest misalignment of connector accessories can derail an entire project. As a connector accessories supplier with 12 years in the game, I’ve walked alongside countless electricians, OEM engineers, and field technicians who write off misalignment as a “small mistake” or “user error”—but let me tell you, most of the time, it’s not the installer’s fault. It’s the lack of clear, actionable steps to get alignment right from the start. Connector Accessories
I remember my first field visit back in 2011, to a auto parts plant in Detroit that was building wiring harnesses for commercial trucks. The line was down for the third time that week, all because their team was misaligning weather seals on power connectors. The techs were rushing, forcing seals into housings at an angle, and by the end of the shift, 20% of the seals were cracked or sealed improperly, leading to water intrusion failures. At the time, I thought “alignment” was just sliding a part into place—no big deal. That visit changed everything. It taught me that proper alignment isn’t just about fitting parts together; it’s about matching part geometry, following precise steps, and using the right tools to eliminate human error. Today, I work with clients across aerospace, renewable energy, and industrial automation, and alignment remains the single most common preventable issue we help solve. If you’re tired of reworking installations or field callbacks, here’s how to ensure your connector accessories align correctly, every single time.
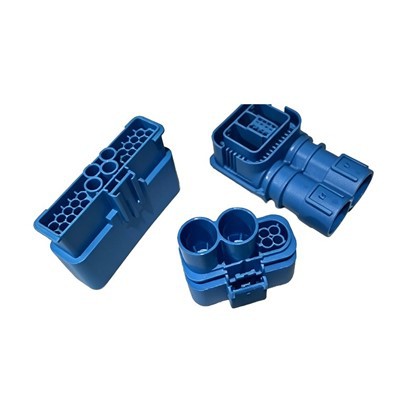
First, you need to start with the basics: know your part geometry and design features. This sounds obvious, but you’d be surprised how many installers don’t take 60 seconds to study the unique shapes of their accessories before picking up a screwdriver or a crimper. Connector accessories—think strain reliefs, weather seals, grommets, adapter sleeves, and polarization keys—aren’t generic. Every one has intentional design cues to guide alignment, and ignoring those cues is the number one cause of misalignment.
For example, take a strain relief for a high-voltage industrial connector I supply. It has a D-shaped inner opening that matches the flat edge of the connector housing’s cable entry, plus two small tabs that snap into notches on the housing flange. When installed at a 15-degree angle, the tab will catch on the flange and break, even if you force it straight later. During a training session I led last month for a solar installation team in Texas, one new tech told me he’d never noticed the D-shape on his strain reliefs before—he just lined up the top edge and called it good. In their last job, 18% of their strain reliefs were improperly aligned, leading to cable pull-outs that damaged the entire harness.
The fix here is simple: before starting any installation, do a visual scan of your connector housing and the accessory. Look for: polarization keys (small plastic tabs that only fit one way), unique edge shapes (D-shapes, hexes, or notches), and alignment reference marks (small dots, lines, or molded arrows on the accessory and housing). If you can’t find these marks, stop—don’t guess. Most quality accessory suppliers (including mine, FWI) print installation guides with clear side-by-side photos of alignment points, or can send a sample set marked with high-vis paint to make these cues more visible. Last quarter, we sent custom-marked samples to a medical device manufacturer that was misaligning adapter sleeves for their pacemaker connector housings; after one day of training, their misalignment rate dropped from 22% to 0.8%. That’s the kind of impact small, intentional geometry checks can have.
Next, use step-by-step installation sequences that account for accessory order. Too often, installers grab accessories and push them on in whatever order is fastest, which leads to misalignment long before the final connection. Let’s take a common wiring harness installation: you have a grommet, a strain relief, and a weather seal that all need to sit between the cable and the connector housing. If you slide the grommet on first, then the strain relief, the strain relief’s tabs can get caught under the grommet, making it impossible to align the seal correctly at the end. I’ve seen this same mistake in aerospace wiring, where a misaligned grommet can delay a plane’s launch by hours.
The key here is to build a written installation sequence and follow it exactly. For example, our team at FWI works with each client to create custom sequence guides for every connector accessory set we supply. For that same high-voltage strain relief, we recommend: 1) Thread the weather seal onto the cable first, sliding it back 2 inches to keep it out of the way; 2) Slide the grommet onto the cable, aligning its notch with the cable’s jacket seam; 3) Crimp the terminal onto the wire, then insert it into the connector housing; 4) Slide the grommet forward into the housing’s rear cavity, pressing evenly until it clicks; 5) Align the strain relief’s tabs with the housing’s notches, then twist it clockwise 1/4 turn until it locks. This sequence eliminates interference between parts at every step, so alignment isn’t an afterthought—it’s built into the process.
I always tell my clients: if your sequence skips an accessory step, you’re setting yourself up for misalignment. One construction client last year tried to skip the grommet step entirely, saying it “didn’t fit the timeline.” They ended up with 31 misaligned seals in a single batch of 100 connectors, all of which required rework on-site at a wind farm, costing them $12,000 in labor and delayed project penalties. Taking 2 extra minutes to follow a pre-planned sequence isn’t a waste of time—it’s a way to avoid costly rework later.
Third, use precision tools, not brute force. This is probably the biggest mistake I see installers make: forcing an accessory into place with pliers, a screwdriver, or even their bare hands, because “it just needs to go in.” Misalignment from brute force isn’t just a minor fit issue—it can crack plastic accessories, bend metal pins inside the connector, or create gaps that let water or dust get in. Last year, a defense contractor contacted me with a batch of misalignment failures on military communication connectors. When our quality team looked at the faulty parts, they saw 40% of the weather seals had hairline cracks from being forced at an angle, and 15% had bent polarization tabs that made the connector fit loosely. The technician told us, “It felt like it was going in, so I just pushed harder.” That’s exactly the problem.
Proper tools for alignment don’t require a huge investment. For most connector accessories, you just need a few basic tools that guide parts into place evenly. For example, alignment sleeves are simple plastic or metal tools that fit over the connector housing and the accessory, keeping them perfectly centered as you push. I supply these sleeves as a free add-on for most of my high-volume clients—they cost almost nothing, but they reduce alignment errors by up to 90%. For accessories that twist into place, torque wrenches with preset stops (set to the exact torque specified in the installation guide) eliminate over-twisting that can misalign parts or break tabs. We worked with a medical device maker that was using regular pliers to twist strain reliefs; switching to a $80 preset torque wrench cut their misalignment rate by 19% in their first month.
Another tool that’s often overlooked is a go/no-go gauge. These simple, low-cost tools are made to fit only when an accessory is perfectly aligned. For example, a go gauge will slide over a correctly aligned seal, while a no-go gauge will stop 1/16 inch away if it’s tilted. This is perfect for quality checks: instead of guessing if a part is aligned right, you just run the gauge over it, and it tells you instantly. We supply go/no-go gauges as part of our starter kits for new clients, because they take the human judgment out of alignment checks. I once watched a tech at a aerospace plant use a go/no-go gauge and say, “I thought that was aligned, but the no-go gauge stopped—saved me from 2 hours of rework later.” That’s the power of simple, precision tools.
Fourth, account for environmental and material factors that affect alignment. Most guides and training materials focus on “ideal” installation conditions, but the real world is messy: extreme heat, cold, or moisture can make plastic accessories expand or contract, making alignment harder. For example, if you’re installing a connector accessory in freezing temperatures, the plastic may be stiffer and less flexible, so it’s easier to tilt it during installation. Conversely, in 100-degree heat, rubber seals may be softer and more likely to slip out of alignment.
I learned this lesson firsthand a few years ago, when I supplied a set of cold-weather resistant weather seals to an oil and gas client working in Alaska. They were installing connectors outdoors in temperatures of -20°F, and their first batch had a 14% misalignment rate. We tested the seals in our lab and found that at those temperatures, the D-shaped inner opening was slightly more oval than at room temperature, so the techs weren’t aligning it perfectly with the housing’s flat edge. We adjusted the seal’s inner mold to have a slightly wider oval at cold temperatures, and also created a cold-weather installation guide that recommended warming the accessories in a bag of warm air for 2 minutes before installation. The next batch had a misalignment rate of less than 1%.
Material differences also matter: metal strain reliefs and plastic grommets expand at different rates when exposed to temperature changes, so even if they align perfectly at room temperature, they can shift once installed in a hot rooftop or cold engine bay. That’s why all the connector accessories I supply are designed with temperature-compensating geometries, and every installation guide includes a section for extreme temperature conditions. If you’re working in harsh environments, don’t skip that section—it’s there for a reason.
Finally, implement a quick pre-installation check and post-installation verification process. Even with the right geometry, sequence, tools, and environmental adjustments, small errors can slip through the cracks if you don’t check at key points. A 10-second pre-install check before you pick up an accessory can catch simple mistakes: is this the right accessory for this connector? Is it free of cracks or defects that would make alignment harder? Is the cable’s jacket smooth, with no nicks that would catch on the accessory?
Then, post-install verification doesn’t have to be a complex quality audit. For most low-to-medium volume jobs, just a visual check: does the accessory sit flush against the housing, with no gaps around the edges? Is there no more than 1/32 inch of side-to-side play? For high-voltage or mission-critical connectors, add a functional check: tug on the cable gently (no more than 5 lbs of force) to make sure the strain relief is holding firmly, and run a quick continuity or insulation test to confirm no gaps caused by misalignment.
I once worked with a renewable energy client that was installing hundreds of solar panel connectors a day. Their post-install check was just a quick visual scan, and they still had 3-4 misaligned connectors per 100. We added a 20-second step: after installing the strain relief, run a finger around the edge to make sure it’s completely flush, and tug the cable once. Within two weeks, their misalignment rate dropped to 0.5%. That’s the thing about alignment: it’s not about perfection—it’s about small, consistent checks that catch errors before they become expensive problems.
If you’re struggling with connector accessory alignment, I want you to take away this: it’s not a skill that you either have or you don’t. It’s a set of simple, intentional steps that anyone can follow, and the right supplier can help you implement them. I’ve spent the last decade refining our connector accessories to be as easy to align as possible, while also supporting our clients with training, custom installation guides, and tools to make every installation go right.
Whether you’re a field technician working on a construction site, an engineer designing a new medical device, or a line manager at an auto parts plant, proper alignment doesn’t have to be a headache. The key is to stop treating alignment as an afterthought, and start building it into every step of your process. If you’re ready to cut your misalignment rates, reduce rework costs, and get your projects done on time, reach out to discuss your specific needs. We can provide sample parts, custom training, and tailored solutions that fit your exact connector accessory requirements.
3C Accessories References
- Molex Connector Accessories Alignment Best Practices, Molex Incorporated, 2022
- International Electrotechnical Commission (IEC) 60512-1-1: Connectors for Electronic Equipment – General Requirements and Tests, Section 1.1: Dimension and Alignment Standards, 2020
- National Electrical Manufacturers Association (NEMA) WD 6-2018: Wiring Devices – Connector Accessories, Installation Guidelines for Field Wiring
- TE Connectivity Field Installation Error Reduction Report, 2021: Alignment as a Preventive Maintenance Metric for Industrial Connectors
Modelon Precision Industry (Suzhou) Co., Ltd.
With abundant experience, we are one of the most professional connector accessories manufacturers and suppliers in China. Welcome to buy customized connector accessories at competitive price from our factory. If you have any enquiry about pricelist, please feel free to email us.
Address: 1st Floor, Building 22, No. 2628 North Gate Road, Kunshan City, Jiangsu Province, P.R.China
E-mail: jessica_huang2025@163.com
WebSite: https://www.modeloncn.com/
